Reactive Programming with Spring Boot
아래는 Spring 공식문서에 나와있는 Spring MVC와 Spring Webflux에 대한 설명이다.
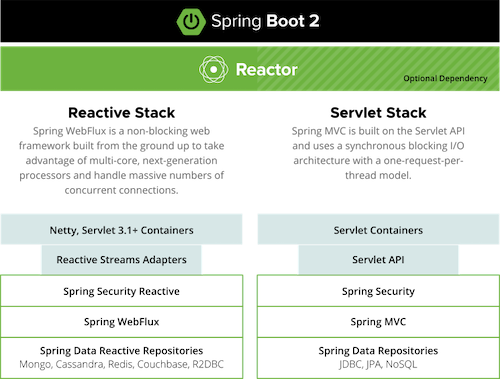
Spring MVC는 동기 블로킹 기반의 서블릿 API와 request-per-thread 모델을 제공하고, Spring Webflux는 대량의 동시 커넥션이 가능한 Non-Blocking 웹 프레임워크이다.
해당 부분을 조금 더 풀어서 알아보자.
Spring Webflux
Spring MVC는 request-per-thread 모델이기 때문에 만약 1만개 이상의 요청이 동시에 들어온다면 쓰레드가 부족하게 된다.
Spring Webflux는 쓰레드를 가능한 최소한으로 사용하는 모델과 리액티브 프로그래밍 라이브러리를 제공한다고 생각하면 된다.

Spring Webflux는 비동기 + 리액티브 프로그래밍을 기본으로 한다.
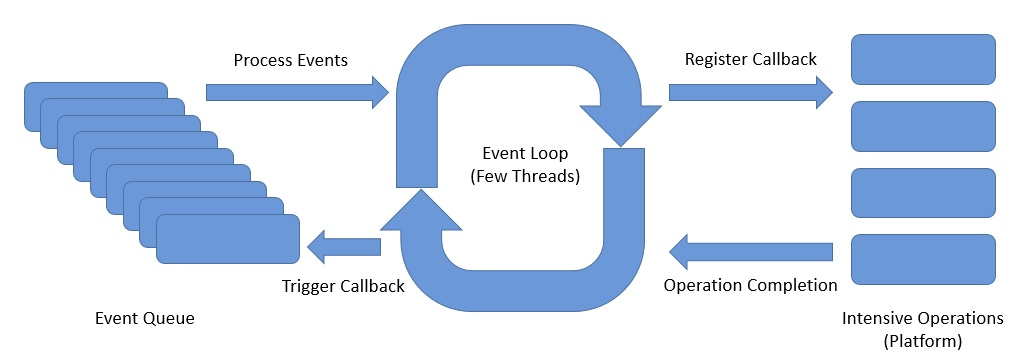
- 요청을 Event-Driven 방식으로 처리한다.
- 작업이 완료될 때까지 다른 일을 하다가, 처리가 완료되면 Callback 메서드를 통해 응답을 반환한다.
- 비동기 + 논블로킹
Webflux는 작업이 끝날 때까지 기다리지 않기 때문에 cpu, thread, memory의 자원을 최대한 낭비하지 않고 효율적으로 동작하는 고성능 애플리케이션 개발에서 사용한다.
토비님의 세미나에서는 서비스 간 호출이 많은 마이크로 서비스 아키텍처에 적합하고, 함수형 프로그래밍의 이점이 있는 것도 Webflux를 선택하기에 충분한 이유가 된다고 설명한다.
Netty

Spring Webflux를 사용하면 요청을 받는 내장 서버로 기본적으로 Netty를 사용한다.
Netty는 Async / NIO(Non-Blocking IO)에 초점을 둔 이벤트 기반 네트워크 애플리케이션 프레임워크이다. Netty는 유지보수를 고려한 고성능 프로토콜 서버나 클라이언트를 개발할 때 주로 사용한다.
Netty의 장점은 아래와 같다.
- 비동기 이벤트 기반 네트워킹(Event Driven)을 지원
- Tomcat과 다르게 자원이 항상 스레드를 점유하고 Block을 유지하지 않으므로 처리량 대폭 증가
- 스레드 수가 적다.
- Context switching 오버헤드 감소 (1개 Thread에서 쌓인 Event Queue를 기반으로 Non-Blocking으로 동작하기 때문!)
Event Loop
Netty에서 핵심은 Event Loop이다.
Event Loop에는 아래의 컴포넌트가 있다.
- Channel:
- 하나의 이벤트 루프에 등록된다.
- Channel에서 이벤트가 발생하면 해당 이벤트 루프의 이벤트 큐에 등록된다.
- Event Loop: 이벤트 큐에서 이벤트를 꺼내어서 작업을 비동기로 실행 (1개의 Thread는 여러개의 Event Loop 가질 수 있다.)
- Pipeline: 이벤트를 받아서 Handler로 전달
아래 코드를 보자.
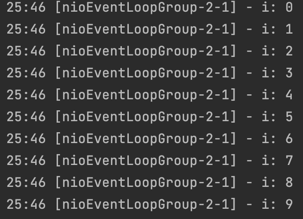
EventLoopGroup은 io.netty.channel에 있는 Netty가 사용하는 EventLoopGroup이다.
- Netty에서는 EventLoop를 직접 사용할 수 없다. 그래서 EventLoopGroup를 사용한다.
public static void main(String[] args) {
    EventLoopGroup eventLoopGroup = new NioEventLoopGroup(1);

    for (int i = 0; i < 10; i++) {
        final int idx = i;
        eventLoopGroup.execute(() -> {
            log.info("i: {}", idx);
        });
    }

    eventLoopGroup.shutdownGracefully();
}
EventLoop는 1개의 쓰레드에서 동작하기 때문에 아래와 같이 들어간 순서가 보장된다.
Event Loop Group
Netty의 EventLoopGroup은 여러 개의 EventLoop를 포함할 수 있다.
public static void main(String[] args) {
    EventLoopGroup eventLoopGroup = new NioEventLoopGroup(5);

    for (int i = 0; i < 12; i++) {
        final int idx = i;
        eventLoopGroup.execute(() -> {
            log.info("i: {}", idx);
        });
    }

    eventLoopGroup.shutdownGracefully();
}
결과는 아래와 같다.
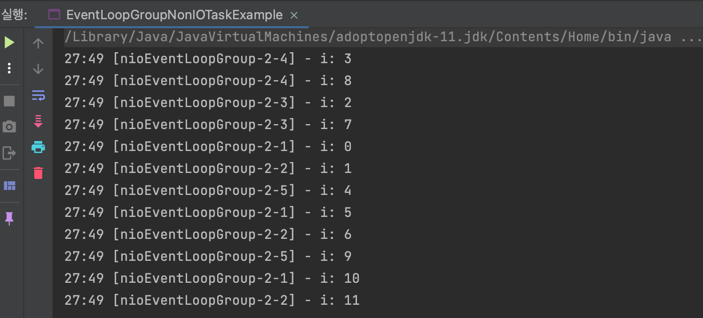
다른 EventLoop 간 쓰레드가 동일함을 보장하지 않으므로 순서를 보장하지 않는다.
단, 로그를 자세히 보면 동일한 EventLoop 간은 순서가 보장된다.
Channel
Netty는 Java NIO의 Channel과 유사한 자체적인 Channel을 만들어서 사용한다. 차이점은 Pipeline이나 Future와 같은 추가적인 기능을 제공한다.
AbstractChannel
Netty의 AbstractChannel 내부적으로 Pipeline을 갖는다.
Netty에서 제공하는 모든 Channel은 Pipeline을 사용한다.
NioServerSocketChannel
Netty 서버를 구성할 때 NioServerSocketChannel을 주로 사용한다.
NioServerSocketChannel은 AbstractNioChannel을 상속하고, AbstractNioChannel은 내부적으로 자신이 등록된 Selector와 SelectableChannel을 가진다.
그래서 Selector와 SelectableChannel을 사용해서 더 쉽게 현재 상태를 파악할 수 있다.
ChannelFuture
아래는 ChannelFuture 인터페이스의 일부이다.
public interface ChannelFuture extends Future<Void> {
    Channel channel();

    @Override
    ChannelFuture addListener(GenericFutureListener<? extends Future<? super Void>> listener);

    @Override
    ChannelFuture removeListener(GenericFutureListener<? extends Future<? super Void>> listener);

    @Override
    ChannelFuture sync() throws InterruptedException;

    // ...
}
ChannelFuture는 아래 역할을 수행한다.
- Channel I/O 작업이 완료되면 isDone이 ture가 되는 Future
- FutureListener를 등록/삭제하여 Write이 완료되었을 때 비동기 처리 가능
- addListener: Channel I/O 작업이 완료되면 수행할 Listener 등록
- removeListener: 등록된 Listener 제거
- sync: 작업이 완료될 때까지 Blocking
ChannelPipeline
Netty에서 매우 중요한 역할을 하는 것 중 하나가 ChannelPipeline이다.
아래 그림을 보자.
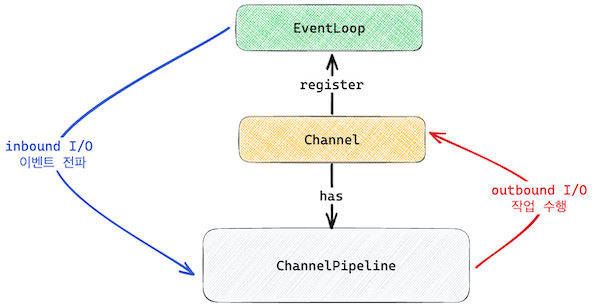
해당 그림을 설명하면 아래와 같다.
- EventLoop는 Channel의 Inbound I/O를 감시한다.
- EventLoop는 I/O가 준비되면 ChannelPipeline으로 이벤트를 전파한다.
- ChannelPipeline은 I/O 이벤트를 처리한다.
- ChanelPipeline은 처리가 완료되면 Channel에 결과를 Outbound I/O로써 write 한다.
즉, ChannelPipeline을 어떻게 구성하는 지가 핵심이 된다.
ChannelPipeline의 내부는 아래와 같이 구성된다.
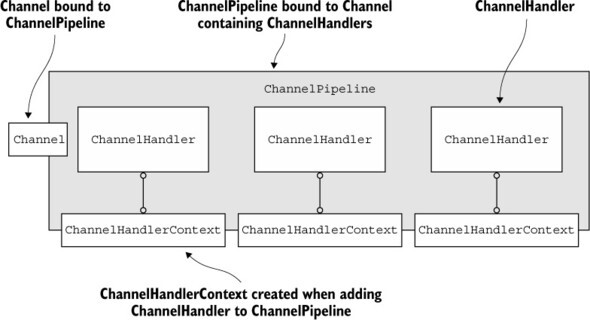
ChannelPipeline은 여러 개의 ChannelHandler를 가지고, 각 ChannelHandlerContext와 연결된 것을 볼 수 있다.
다음은 ChannelHandlerContext와 ChannelHandler에 대해 알아보자.
ChannelHandlerContext
위 그림과 같이 pipeline의 ChannelHandlerContext는 LinkedList 형태로 next, prev를 통해 연결되어 있다.
각 ChannelHandlerContext는 I/O 작업을 처리한 후 다음 Context에 넘기게 된다.
다음은 ChannelHandlerContext의 내부이다.
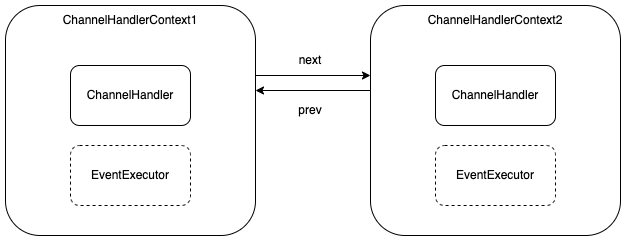
1개의 ChannelHandlerContext는 ChannelHandler를 가진다.
그리고 ChannelHandlerContext는 EventExecutor를 가질 수 있다. EventLoop에 Blocking이 생기는 것을 막고 별도 쓰레드에서 I/O 작업을 수행하기 위해 EventExecutor를 사용한다.
ChannelHandler
ChannelHandler는 I/O 이벤트를 받아서 다음 Context에게 넘겨줄 수 있고, 직접 I/O 작업을 수행할 수도 있다.
inbound I/O 이벤트는 ChannelInboundHandler가 처리하고, Outbound I/O 이벤트는 ChannelOutboundHandler가 처리한다.
참고로 ChannelDuplexHandler는 ChannelInboundHandler, ChannelOutboundHandler 둘 다 구현한다.
ChannelInboundHandler
ChannelInboundHandler는 다양한 경우에 핸들링할 수 있는 메서드를 제공한다.
- channelRegistered: Channel이 EventLoop에 등록된 경우
- channelUnregistered: Channel이 EventLoop에서 제거된 경우
- channelActive: Channel이 Active된 경우
- channelInactive: Channel이 Inactive된 경우
- channelRead: Channel로부터 메시지를 읽을 준비가 된 경우
- channelReadComplete: Channel로부터 모든 메시지를 읽은 경우
- channelWritabilityChanged: Channel이 Write가 가능한 상태가 변경된 경우
ChannelOutboundHandler
ChannelOutboundHandler도 Outbound I/O 작업을 가로채서 처리할 수 있는 메서드를 제공한다.
- bind: serverSocketChannel에 bind 요청 시 호출
- connect: socketChannel이 connect 요청 시 호출
- disconnect: socketChannel이 disconnect 요청 시 호출
- deregister: eventLoop로부터 deregister되면 호출
- read: channel에 대한 read 요청 시 호출
- write: channel에 대한 write 요청 시 호출
- flush: flush 작업 수행 후 호출
- close: channel이 닫히면 호출
예시 코드
아래는 ChannelInboundHandlerAdapter를 상속받는 클래스이다. ChannelInboundHandlerAdapter는 ChannelInboundHandler 인터페이스에 대한 골격을 제공한다.
public class SampleChannelInboundHandler extends ChannelInboundHandlerAdapter {
    @Override
    public void channelRead(ChannelHandlerContext ctx, Object msg) {
        if (msg instanceof String) {
            // 다음 context로 이벤트를 전달하지 않고, outbound I/O 작업을 수행한 후 채널을 닫는다.
            ctx.writeAndFlush("Hello, " + msg)
                    .addListener(ChannelFutureListener.CLOSE);
        } else if (msg instanceof ByteBuf) {
            // 메시지를 가공한 후 다음 context로 이벤트를 전달
            try {
                var buf = (ByteBuf) msg;
                var len = buf.readableBytes();
                var charset = StandardCharsets.UTF_8;
                var body = buf.readCharSequence(len, charset);
                ctx.fireChannelRead(body); // 다음 Context로 read 이벤트 전달
            } finally {
                ReferenceCountUtil.release(msg);
            }
        }
    }
}
받은 값을 그대로 bypass 하는 방식도 가능하다.
아래는 ChannelOutboundHandler의 구현이다.
public class SampleChannelOutboundHandler extends ChannelOutboundHandlerAdapter {
    @Override
    public void write(ChannelHandlerContext ctx, Object msg, ChannelPromise promise) {
        if (msg instanceof String) {
            ctx.write(msg, promise);
        } else if (msg instanceof ByteBuf) {
            var buf = (ByteBuf) msg;
            var len = buf.readableBytes();
            var charset = StandardCharsets.UTF_8;
            var body = buf.readCharSequence(len, charset);
            ctx.write(body, promise);
        }
    }
}
해당 Handler는 String 타입일 경우 다음 OutboundHandler에게 패스하고, ByteBuf 타입이라면 가공한 후 write 한다.
Encoder, Decoder
Netty에서 외부에서 들어오는 데이터를 변환해주는 Decoder가 있고, 내부의 데이터를 변경해주는 Encoder를 사용할 수 있다.
Decoder의 경우 ChannelInBoundHandler를 구현하고, Encoder의 경우 ChannelOutBoundHandler를 구현한다.
예를 들면 Netty는 아래의 클래스를 제공한다.
- StringDecoder: ByteBuf 객체를 String으로 변환하여 다음 Handler에게 제공한다.
- StringEncoder: String 객체를 ByteBuf로 변경하여 다음 handler에 제공한다.
이를 사용하면 Handler의 구현을 간소화할 수 있다.
Bootstrap
Netty는 Netty 서버나 클라이언트를 쉽게 만들 수 있게 Bootstrap이라는 클래스를 제공한다.
Bootstrap은 다음의 메서드를 가진다.
- group: EventLoopGroup 등록
- parent(accept 이벤트), child(read 이벤트)
- channel: Channel 클래스를 기반으로 인스턴스 생성
- childHandler: connect되었을 때 실행할 코드
- bind: 특정 호스트, 포트에 bind하고 channelFuture 반환
아래는 Bootstrap을 활용한 TCP 서버의 예시이다.
EventLoopGroup parentGroup = new NioEventLoopGroup();
EventLoopGroup childGroup = new NioEventLoopGroup(4);

var bootstrap = new ServerBootstrap();
var executorGroup = new DefaultEventExecutorGroup(4);
var stringEncoder = new StringEncoder();
var stringDecoder = new StringDecoder();

var bind = bootstrap
        .group(parentGroup, childGroup)
        .channel(NioServerSocketChannel.class)
        .childHandler(new ChannelInitializer<SocketChannel>() {
            @Override
            protected void initChannel(SocketChannel ch) {
                ch.pipeline()
                        .addLast(executorGroup, new LoggingHandler(LogLevel.INFO))
                        .addLast(stringEncoder, stringDecoder, echoHandler());
            }
        })
        .option(ChannelOption.SO_BACKLOG, 128)
        .childOption(ChannelOption.SO_KEEPALIVE, true)
        .bind(8080);

bind.sync().addListener(future -> {
    if (future.isSuccess()) {
        log.info("Server bound to port 8080");
    }
});
Bootstrap은 각 컴포넌트 조립을 수행해서 Netty 코드를 줄이는 데 큰 도움을 준다.
정리
지금까지 정리한 내용을 정리해보면 Netty의 전체적인 구성은 아래와 같다.
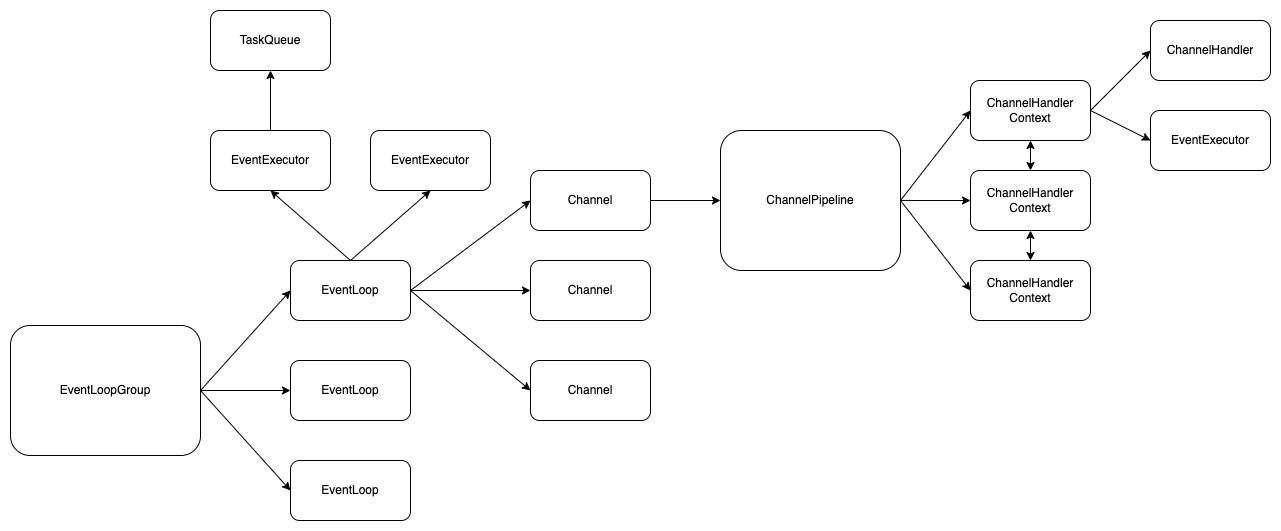
이상으로 Netty에 대한 내용을 마치고 다음에는 Reactor에 대해서 자세하게 알아보자.